Saturday, May 28, 2011

Thai Beef with Broccoli and Carrots

Have you ever looked in your refrigerator and then at a recipe, and tried to figure out whether you had the right ingredients to make it? That happened to me. I had beef, carrots, broccoli, shallots, and ginger and wanted to use them up. So I consulted my Fresh Thai Cookbook, written by Oi Cheepchaiissara, to see what was possible. I found myself flipping back and forth between a beef and vegetables recipe. It seemed to me that I could use the sauce from the Stir-Fried Mixed Vegetable recipe, with elements from the Beef with Bell Peppers recipe.

I used the sauce from the vegetable recipe (I doubled it, but I don't think that was necessary, so I cite the original amounts below), and the beef portion, with the substitution of broccoli, carrots, and ginger for the bell peppers.

The dish, which I served over jasmine rice, came out quite well. It was quick and easy, with very little prep time necessary. I squeezed fresh lime juice over it, which gave it a nice tang. I'll definitely make it again.

Enjoy!

Thai Beef with Broccoli and Carrots
1.5 tablespoons vegetable oil
3 garlic cloves, finely chopped
1 cm piece of fresh ginger, chopped
1 small onion or shallot, sliced
9 oz. tender steak rump or fillet, thinly sliced
1/4 cup vegetable stock
1 tablespoon light soy sauce
2 tablespoons oyster sauce

1. Heat the oil in a non-stick wok or skillet and stir-fry the garlic and ginger over medium heat until lightly browned.


2. Add the beef and stir-fry for 3-4 minutes.


3. Mix the stock, soy sauce and oyster sauce in a cup.

4. Add the liquid, broccoli, carrots, and onions. Sir fry for another 2-3 minutes.


Thursday, May 5, 2011

Cook's Illustrated Chocolate Chip Cookies: Are They Really Perfect? Yes!

As a serious baker I have tried more than my (and everyone else's) fair share of chocolate chip cookie recipes. While I love them, I realized after making the Cook’s Illustrated (CooksIllustrated.com) version that I wasn't serious about making the perfect chocolate chip cookie. I was a hack. And if being a bad hack were possible, then that's what I was. I may as well tell the truth.

With shame do I now reflect on past, lame efforts to produce a scrumptious round of chocolatey goodness. Confession is supposed to be good for the soul, right? Ok, here goes . . . I admit to using light brown sugar instead of dark. Even worse, I confess to having put old, dead brown sugar in the microwave to soften it up before using it. I know, I know -- it's disgraceful. Is it any wonder that my homemade chocolate chip cookies often tasted little better than the flavorless ones found on the supermarket shelf?

But I changed my ways.

Thanks to the Cook's Illustrated recipe.

Not kidding.

I admit that I thought that some of the steps were a little over-the-top. Use a whisk and not a mixer? Don't use a non-stick pan to melt the butter? Mix unmelted butter into the melted butter? Turn the cookie sheet halfway through the baking time?

"They're just chocolate chip cookies. It's not that serious," I screamed to no one in particular as I painstakingly worked my way through the recipe.

But it was and is. I sensed that Cook's Illustrated was on to something that I did not want to miss.

As I followed the recipe, I realized that making a superior, crunchy yet chewy chocolate chip cookie takes some effort. I'm grateful that Cook's Illustrated went to the trouble to put together the perfect recipe.

I'll never be flippant about making chocolate chip cookies again!

I promise.

Cook's Illustrated Chocolate Chip Cookies

Ingredients

1 3/4cups unbleached all-purpose flour (8 3/4 ounces)
1/2teaspoon baking soda
14tablespoons unsalted butter (1 3/4 sticks)
1/2cup granulated sugar (3 1/2 ounces)
3/4cups packed dark brown sugar (5 1/4 ounces) (see note)
1teaspoon table salt
2teaspoons vanilla extract
1large egg
1 large egg yolk
1 1/4cups semisweet chocolate chips or chunks (see note)
3/4cup chopped pecans or walnuts, toasted (optional)

Instructions

1. Adjust oven rack to middle position and heat oven to 375 degrees. Line 2 large (18- by 12-inch) baking sheets with parchment paper. Whisk flour and baking soda together in medium bowl; set aside.


2. Heat 10 tablespoons butter in 10-inch skillet over medium-high heat until melted, about 2 minutes.


cooking, swirling pan constantly until butter is dark golden brown and has nutty aroma, 1 to 3 minutes.


Remove skillet from heat and, using heatproof spatula, transfer browned butter to large heatproof bowl.


Stir remaining 4 tablespoons butter into hot butter until completely melted.


3. Add both sugars, salt, and vanilla to bowl with butter and whisk until fully incorporated.


Add egg and yolk and whisk until mixture is smooth with no sugar lumps remaining, about 30 seconds.


Let mixture stand 3 minutes, then whisk for 30 seconds. Repeat process of resting and whisking 2 more times until mixture is thick, smooth, and shiny.


Using rubber spatula or wooden spoon, stir in flour mixture until just combined, about 1 minute.


Stir in chocolate chips and nuts (if using), giving dough final stir to ensure no flour pockets remain.


4. Divide dough into 16 portions, each about 3 tablespoons (or use #24 cookie scoop). Arrange 2 inches apart on prepared baking sheets, 8 dough balls per sheet. (Smaller baking sheets can be used, but will require 3 batches.)


5. Bake cookies 1 tray at a time until cookies are golden brown and still puffy, and edges have begun to set but centers are still soft, 10 to 14 minutes, rotating baking sheet halfway through baking. Transfer baking sheet to wire rack; cool cookies completely before serving.

Wednesday, May 4, 2011

Cooking With Kids for Social Change/Mee Goreng

A few weeks ago, Officer Bill Baxter of the Boston Police Department, told me about a partnership he helped develop with the Police Department, Boston Public Schools, and Haley House Bakery Cafe (http://haleyhouse.org/. Haley House is a great social enterprise that provides training in culinary arts for people who face challenges in gaining skills and employment. It's mission-driven and also produces high-quality, healthy, delicious foods. Haley House has become a central meeting place for activists, politicians and area residents. Good stuff!

Middle school students from the Boston Public Schools prepare dishes from foreign countries with the help of local chefs and cooks, using Haley House's restaurant kitchen. The idea is to promote gang awareness and prevention through cooking, which is a great way to appreciate different cultures and break down barriers between people and groups. Officer Bill (as he is known) gave me an example of how the program works. The kids made a salad and Bill asked them about taking out particular ingredients. They understood that all the ingredients were necessary to make a great salad and that it would be incomplete if one were missing. The kids made the connection between that salad and their social world. Powerful, positive stuff! Bill asked me if I wanted to cook with the kids.

How could I turn down the opportunity?

I couldn't.

So I started exchanging emails with Laura Zientek, who works at Haley House and helps run the cooking classes with the middle school students. I emailed her the recipe (Malaysian mee goreng, a spicy pan-fried noodle dish) and brought the special ingredients, while Haley House supplied everything else.

Yesterday was the big day. I took my son, Brooks, who always helps me in the kitchen when I cook. He was very excited about the class and had been telling his teachers and friends about it. I picked him up from school early and off we went to Haley House, which is located in the Dudley section of Roxbury in Boston.

The cafe is very hip and cool, with exposed brick walls and hardwood floors. It has a warm, cozy atmosphere that makes you want to hang out. While I chatted with Didi Edmonds, a co-founder of Haley House, my son chatted up the guy working behind the counter, trying to talk his way into getting a piece of pastry. Needless to say, I was glad when it was time to go to the back to get ready for the kids. LOL

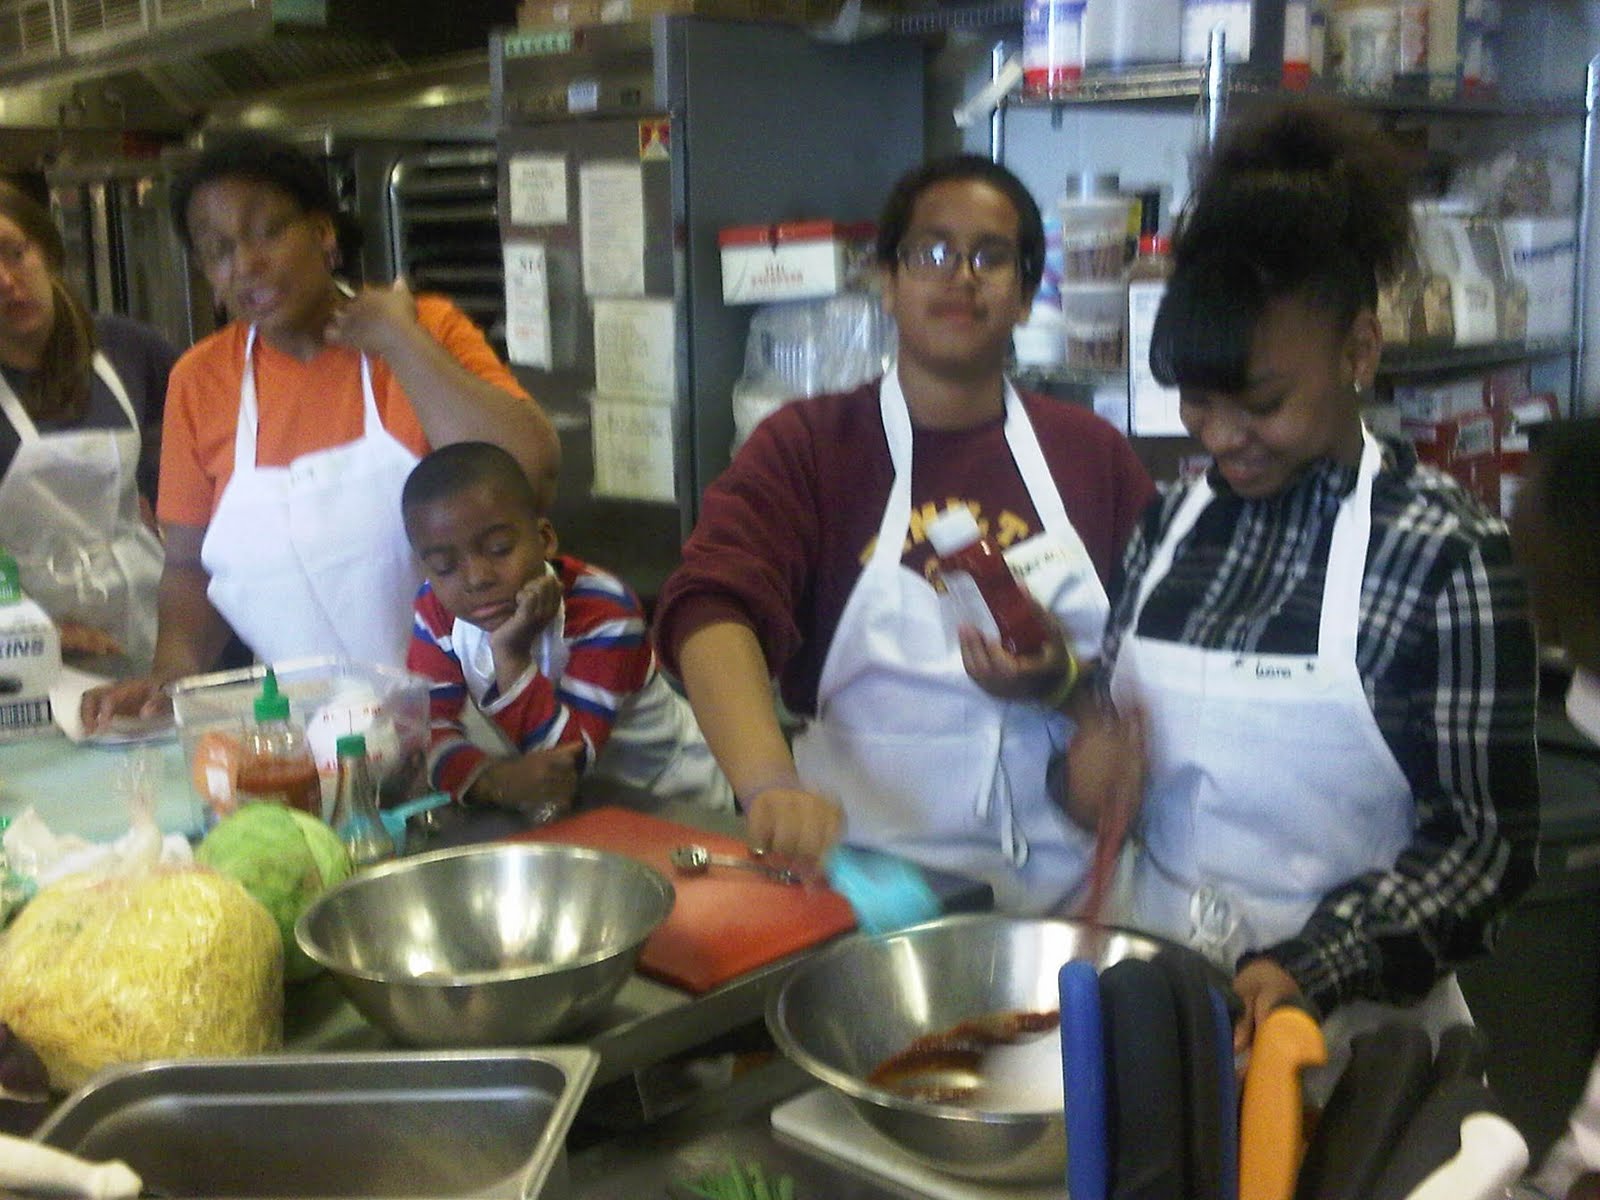
Laura and Julie, a volunteer from Boston College, helped set up the cutting boards, knives, aprons and bowls for the six junior cooks who would take the lead in making the mee goreng.

The kids, along with Officer Bill Baxter and his wife, Gayle Baxter, came in at about 4pm and we started. The first fifteen minutes were devoted to a lesson about Malaysia, which was facilitated by a big map that Laura brought to show the kids. We talked about Malaysia's location, its rich culture and the evolution of its cuisine, which reflects the influences of China, India, Portugal and other countries. I have visited Malaysia twice and brought cookbooks, crafts and postcards to share with the kids, who were quite engaged.


After the lesson, it was time to start cooking. We decided to quadruple the recipe so that there would be left overs for the kids to take home. Making that change was a great opportunity to review fractions with the kids. Had to keep them on their toes.

I gave everyone a task -- chopping, mincing, rinsing, measuring, stirring, etc.


All six junior cooks (plus my son, Brooks) participated with interest and enthusiasm! They smelled Sriracha, oyster sauce, and shao hsing with great curiosity and learned about fermentation. I was impressed that they were determined to put the full amount of Sriracha into the dish. They wanted an authentic mee goreng!


Mee Goreng (Spicy Fried Noodles), from http://rasamalaysia.com/mee-goreng-spicy-fried-noodles/

Fresh Chinese egg noodles, chili sauce, dark soy, oyster sauce, shao hsing wine and fried shallots are available at Asian markets. Serves 5-6 as part of a family-style meal, 3-4 as a main dish.

Ingredients:
2 cups fresh Chinese egg noodles
2 Tbsp chili sauce (Sriracha), or more to taste
1 tsp dark soy sauce
1 tsp sugar
1/4 tsp salt
3 Tbsp oyster sauce
3 Tbsp ketchup
2 Tbsp vegetable or canola oil
2 eggs
1 tsp minced garlic
1 cup mung bean sprouts, rinsed
1/2 cup shredded cabbage
1/4 lb shrimp, peeled and deveined
1/4 lb boneless chicken breast, cut into 1/2-inch cubes (or leftover shredded cooked chicken)
2 Tbsp shao hsing wine
1/4 tsp white pepper
2 Tbsp scallions, sliced
2 Tbsp fried shallots (available packaged at Asian markets)


Bring a large pot of water to a boil. Cook the noodles for 30 seconds, drain, and rinse with cold water. Set aside.

In a small bowl or measuring cup, combine chili sauce, dark soy, sugar, 1/4 tsp salt, oyster sauce and ketchup. Stir to combine, and set aside.


In a large wok (at least 12 inches in diameter) preheated over high heat, add the oil. Crack the eggs into the wok, stir vigorously until the eggs are lightly scrambled and just set, then add the garlic, noodles, bean sprouts, cabbage, shrimp, chicken, and 3/4 cup water.

Stir-fry continuously until noodles are cooked, 3-5 minutes (depending on the heat of your wok), making sure to also cook the chicken and shrimp. Add chili sauce mixture, and keep stirring until well combined. The noodles should begin to get a bit drier (no liquid left in the bottom of the wok).

Add shao hsing wine and white pepper, stir to combine, and remove from heat.

Garnish with scallions and fried shallots.

We skipped the fried shallots, but that's ok!


Time to serve the mee goreng!


We enjoyed the eating the fruit of our labor! I'm happy to report that there were no left overs to take home!!!

Tuesday, May 3, 2011

Lemon Tart

Spring is the time for the appearance of beautiful produce. When I went to the market the other day, my eye was caught by the piles of bright yellow lemons


Without having any particular recipe in mind, I picked out several.

As I was thinking about how to use them I came across a gorgeous food blog, Cannelle et Vanille (http://cannelle-vanille.blogspot.com/). It shares with its audience the culinary adventures of Basque chef, Aran Goyoaga, who resides in the South Florida area. While the site features savory dishes, its forte is definitely pastries, reflecting the culinary training of Goyoaga.

As I looked through the recipes, I decided to put the lovely lemons I purchased to good use in a lemon tart. joyokfbaking.com had a very simple, yet elegant-looking recipe that I decided to use. Tarts seem to to take baking to a higher level of elegance and beauty. For some reason, they make me think of charming cafes in old European cities such as Paris and Amsterdam. Given all the fruit that will be harvested over the next few months, I may do a series on them.

What I love about the lemon tart is that the crust is a homemade shortbread, which is billowy with just the right amount of sweetness. It is certainly a nice change from graham cracker crust, which I do like a good deal.

The filling is quite simple; it is a mixture of a few eggs, lemon juice, cream cheese and grated lemon rind. Let's be clear -- lemon is the star! The tart has just enough sweetness to take the edge off the tartness of the lemon, but not so much that the citrusy flavor is masked. The topping is just as simple -- heaving whipping cream and confectioners' sugar beaten to perfection.

Enjoy!

Lemon Tart

Crust:

1 cup (130 grams) all purpose flour
1/3 cup (35 grams) confectioners (powdered or icing) sugar
1/8 teaspoon salt
1/2 cup (113 grams) cold unsalted butter, cut into pieces

Lemon Filling:

5 ounces (140 grams) cream cheese, room temperature.
1/2 cup (100 grams) granulated white sugar
1/2 cup (120 ml) fresh lemon juice (approximately two large lemons)
2 large eggs
1 tablespoon grated lemon zest (outer lemon skin)

Topping:

1/2 cup (120 ml) heavy whipping cream (contains 35-40% butterfat)
1 tablespoon (10 grams) confectioners (powdered or icing) sugar


Crust: Grease with butter, or spray with a nonstick vegetable cooking spray, an 8 - 9 inch (20 - 23 cm) tart pan with a removable bottom.

In your food processor, place the flour, sugar, and salt and process to combine.

Add the butter and pulse until the pastry starts to come together and form clumps.


Place the pastry in the prepared tart pan and, using your fingertips, evenly press the pastry onto the bottom and up the sides of the pan. (Can use the back of a spoon to smooth the surface of the pastry.)


Pierce the bottom of the crust with the tines of a fork. (This will prevent the pastry crust from puffing up while it bakes.)


Cover and place the pastry crust in the freezer for 15 minutes to chill. (This will help prevent the crust from shrinking while it bakes.)

Preheat oven to 425 degrees F (220 degrees C) and place rack in center of oven.

When the pastry is completely chilled, place the tart pan on a larger baking pan and bake until the crust is golden brown, about 13 - 15 minutes. Remove from oven and place on a wire rack to cool while you make the filling.


Reduce the oven temperature to 350 degrees (177 degrees C).

Filling: In a food processor or electric mixer, place the cream cheese and process until smooth.


Add sugar and process until incorporated. Add eggs, one at a time, and process until thoroughly combined.


Add remaining ingredients and process until well blended and smooth.


Pour filling into pre-baked tart shell and bake for approximately 25 - 30 minutes or until filling is set. Transfer tart to a wire rack to cool and then cover and refrigerate until well chilled, at least an hour.

Topping: Put mixing bowl and whisk in the freezer for 15 minutes. Beat the whipping cream and powdered sugar until stiff peaks form. Transfer the whipped cream to a pastry bag fitted with star tip (#4B), and pipe stars over the entire surface of the tart.


Refrigerate until serving time.

Serves 6 - 8 people.

Read more: http://www.joyofbaking.com/LemonTart.html#ixzz1LIrYtCpK